
Azure Service Principal Setup Guide
This guide will walk you through creating an Azure Service Principal for Otoshek deployments — pick CLI, Cloud Shell, or Portal. All three produce identical credentials.
Get Your Azure Credentials
3:15Video: Get Your Azure Credentials (3:15)
If you have not downloaded your deployment variables file yet, this is a good time to do it.
Choose Azure or GCP below. In this platform, you can either enter variables manually, one card and one field at a time, or use bulk mode. In bulk mode, you fill this template as you go and later paste everything into one textarea, and the platform will sort and validate the variables for you.
If you prefer, you can also copy the templates directly from the Azure bulk format page or the GCP bulk format page.
Deployment target
Before you start
You'll need an Azure subscription to get started. Signing up is free, and Microsoft includes USD 200 in credits for the first 30 days, plus a large bundle of services that remain free for 12 months (and 65+ services that are always free). Since we only provision infrastructure that falls within the free tier, your setup will stay free even after the 30-day credit period—unless you later choose to upgrade.
What we're setting up
What We're Setting Upexpand_more
We want to get the values for the following variables. It's a good idea to copy/paste these somewhere and fill in the values as you follow the tutorial:
ARM_CLIENT_ID=ARM_CLIENT_SECRET=ARM_SUBSCRIPTION_ID=ARM_TENANT_ID=
What These Variables Doexpand_more
| Variable | What it is | Why we need it |
|---|---|---|
ARM_CLIENT_ID | The App-registration / service-principal ID | Tells Azure which app is asking. |
ARM_CLIENT_SECRET | The app's password | Lets the app prove it's really itself. |
ARM_TENANT_ID | Your Entra (AAD) directory ID | Azure checks sign-in against the right tenant. |
ARM_SUBSCRIPTION_ID | The subscription we'll deploy into | So we don't spray resources into the wrong account. |
How Otoshek uses these Variablesexpand_more
- Spin up a dedicated Resource Group – keeps everything we create in one tidy, removable folder.
- Inside that group, provision a Free (F1) App Service Plan and its Web App – $0 by default; you can scale up whenever.
- Establish a GitHub → Azure OpenID Connect trust – your repo can deploy to the Web App via GitHub Actions without storing long-lived secrets.
Choose Your Method
All three methods produce the exact same result. Pick the one that you are most comfortable with.
Cloud Shell
terminalCreate an Azure Service Principal with Cloud Shell (The Easiest Way)
Azure Cloud Shell is a full command-line environment built right into the Azure portal. There's nothing to install, and it's already authenticated to your account.
terminalAccessing Cloud Shell
- In the Azure Portal, click the Cloud Shell icon in the top navigation bar. If a popup opens asking to choose between Bash and PowerShell, choose Bash.

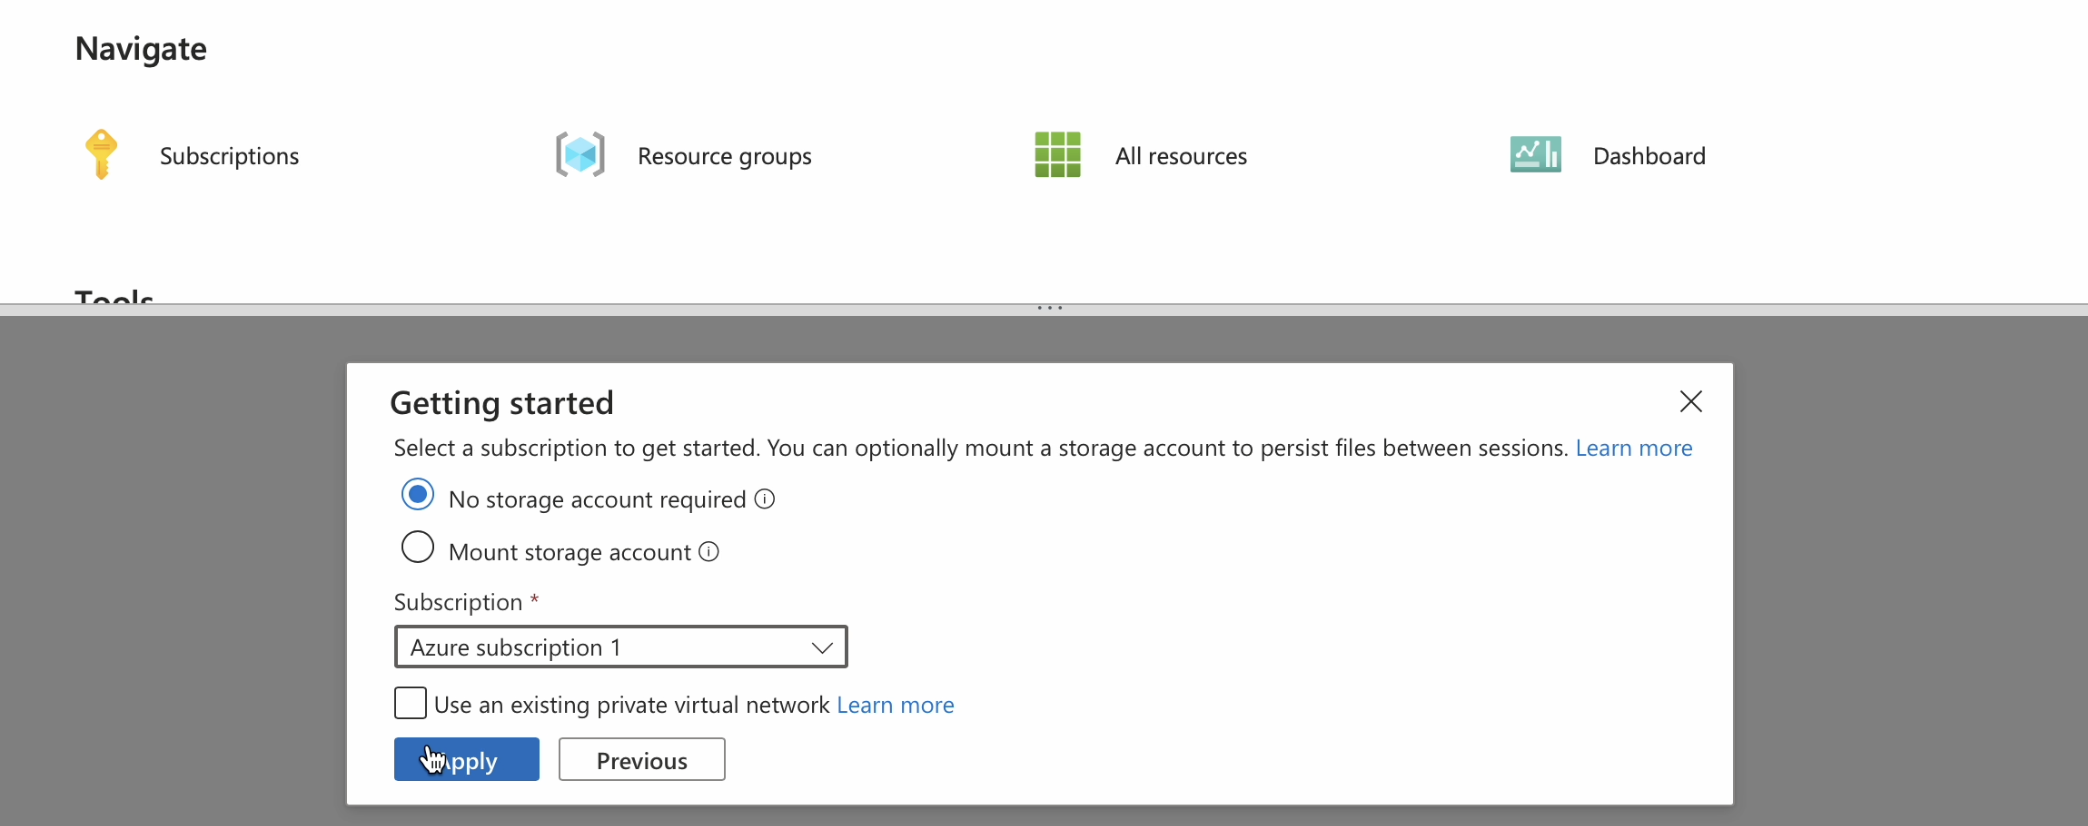
Cloud shell iconClick to enlarge ↗ - First-time setup: If you've never used Cloud Shell before, Azure will prompt you to create a storage account. This is needed to persist your files. Just accept the defaults by clicking "Create storage".
Cloud shell select subscriptionClick to enlarge ↗ - Once the shell loads at the bottom of your screen, ensure you are using the Bash environment. You can confirm you're in Bash by looking at the prompt—it will end with a dollar sign (
$), which is the standard Bash/Linux shell prompt.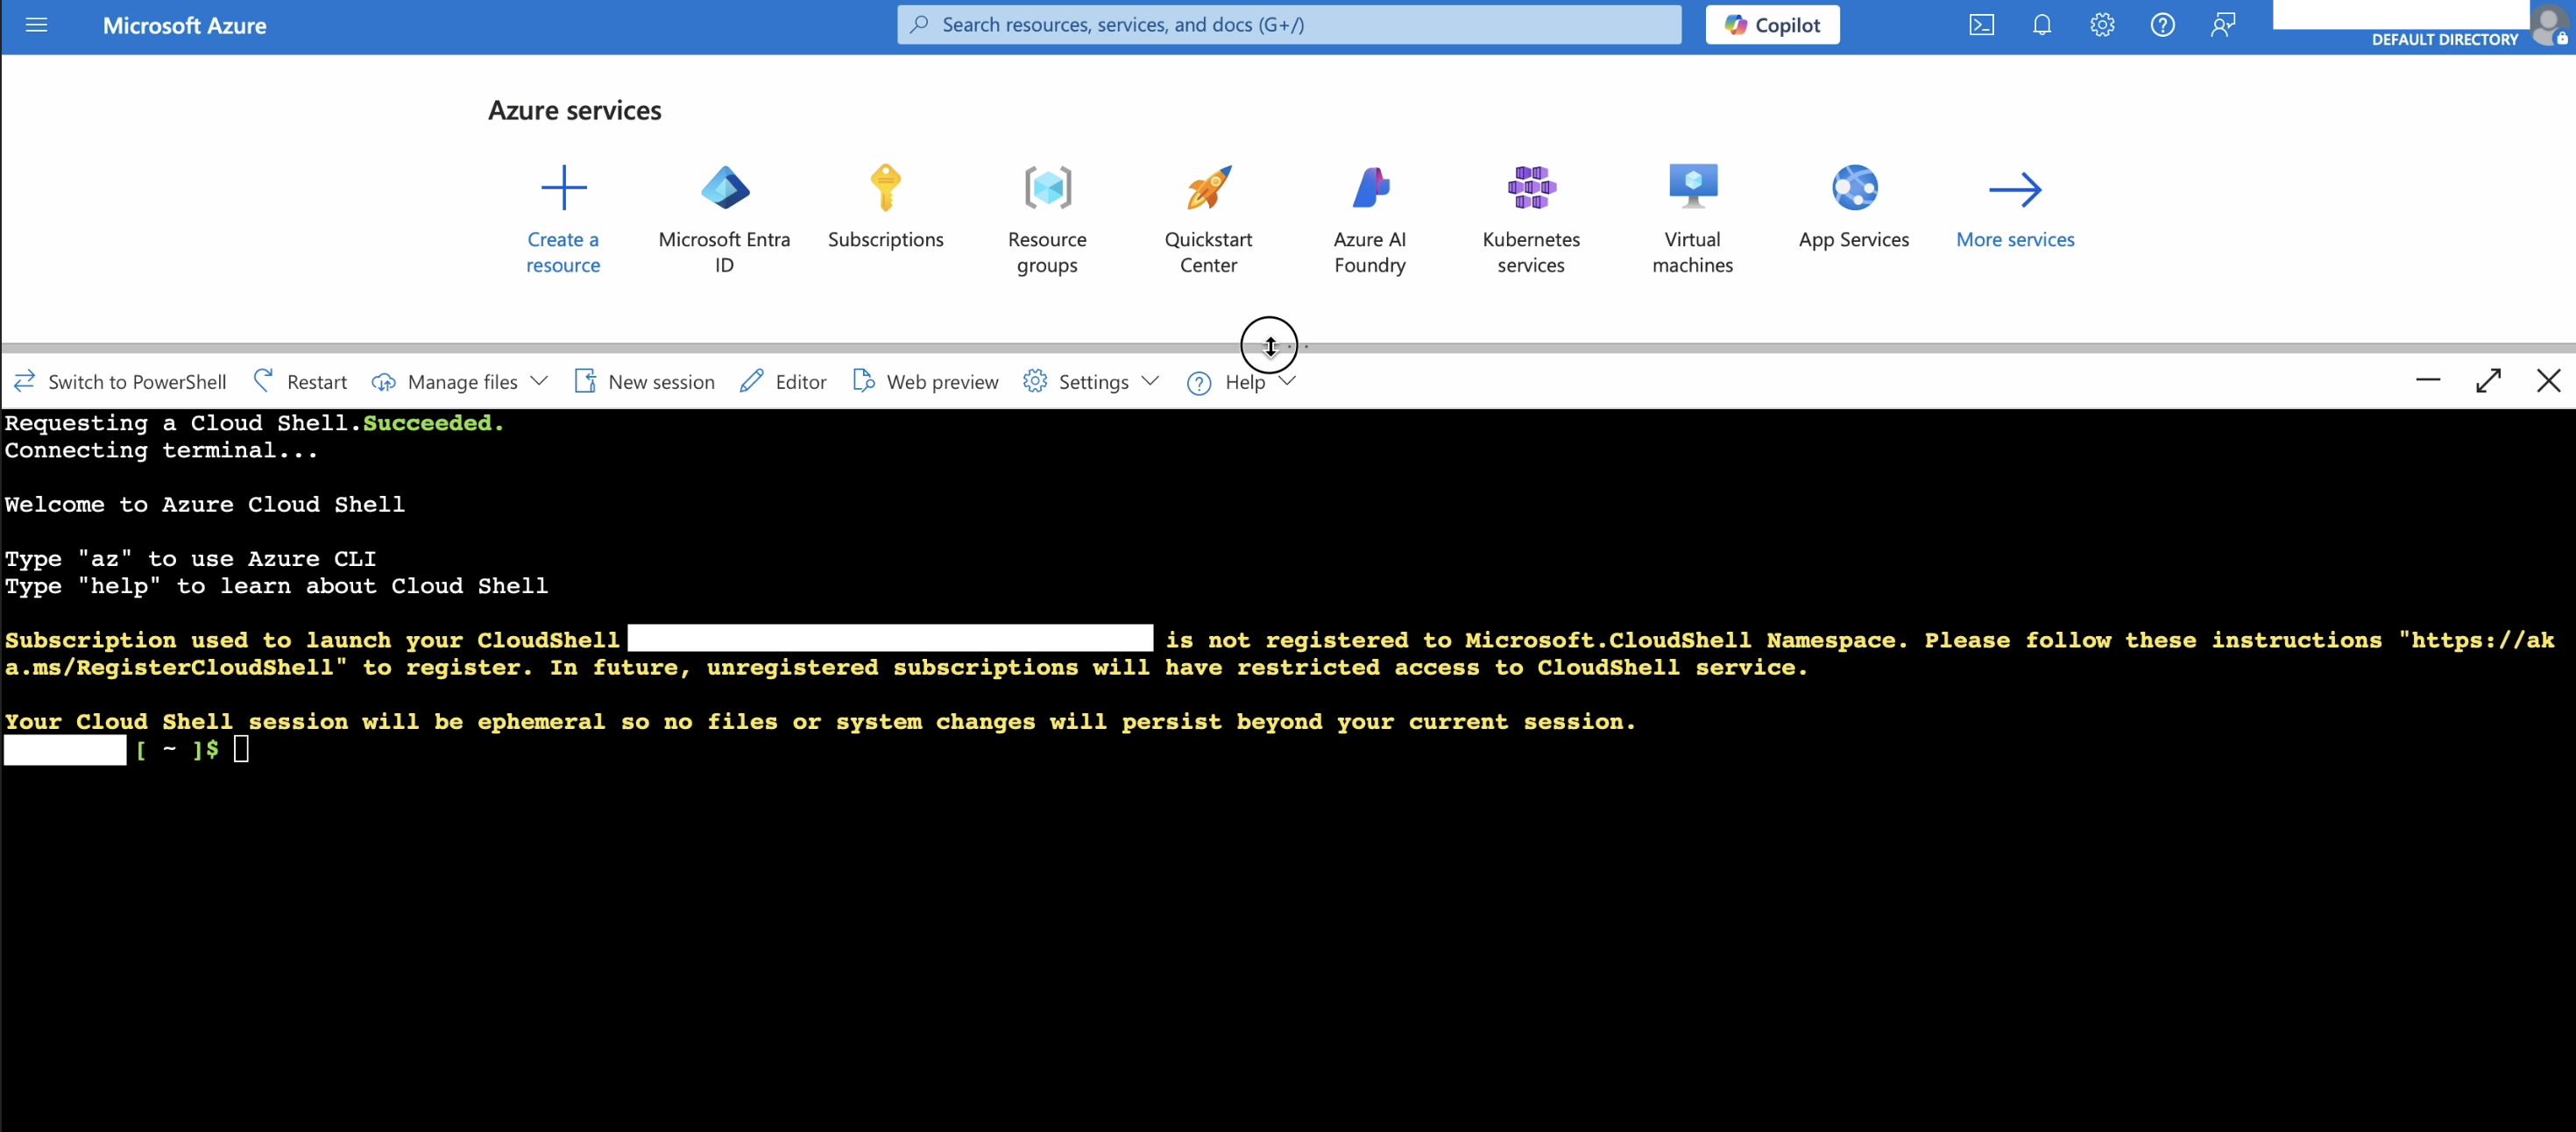
Cloud shell readyClick to enlarge ↗
The All-in-One Script
The following steps will walk you through a script that automates the entire setup. We'll run it piece by piece to understand what's happening.
01Step 1: Set the Service Principal Name and Get Your Subscription ID
First, we'll define a name for our Service Principal and automatically fetch the ID of your currently active Azure subscription.
SP_NAME="otoshek-sp"
SUB_ID=$(az account show --query id -o tsv)
What's happening?expand_more
- SP_NAME: We're giving our Service Principal a descriptive name.
- SUB_ID: We're using the
az account showcommand to get details about the active subscription. The--query id -o tsvpart filters the output to return only the subscription ID in a clean, text-only format.
02Step 2: Create the Service Principal and Assign Roles
This is the powerhouse command. It creates the Service Principal, assigns it the Contributor role on your subscription, and captures its essential credentials.
# This command creates the service principal and captures its credentials
ARM_VARS=($(az ad sp create-for-rbac \
             --only-show-errors \
             --name "$SP_NAME" \
             --role Contributor \
             --scopes "/subscriptions/$SUB_ID" \
             --years 1 \
             --query "[appId,password,tenant]" -o tsv))

# Extract the values from the command output
ARM_CLIENT_ID=${ARM_VARS[0]}
ARM_CLIENT_SECRET=${ARM_VARS[1]}
ARM_TENANT_ID=${ARM_VARS[2]}
ARM_SUBSCRIPTION_ID=$SUB_ID
Let's break down az ad sp create-for-rbacexpand_more
--name "$SP_NAME": Assigns the name we chose in Step 1.--role Contributor: This is the Azure RBAC Role. It grants broad permissions to create and manage resources within your subscription (like web apps, service plans, etc.).--scopes "/subscriptions/$SUB_ID": This limits theContributorrole to your specific subscription, preventing it from accessing other subscriptions.--years 1: Sets the credential's expiry.--query "[appId,password,tenant]" -o tsv: This is key. It filters the command's JSON output to give us only the three values we need: the Client ID, the Secret, and the Tenant ID, formatted as plain text.
How do the ARM_ variables get set?
The output of the az command is captured into a shell array named ARM_VARS. We then assign each element of that array to our final, clearly-named variables (ARM_CLIENT_ID, ARM_CLIENT_SECRET, etc.).
03Step 3: Grant Directory Permissions for OIDC
Your Service Principal needs one more permission: the ability to manage application settings in Microsoft Entra ID. This is crucial for setting up the OIDC connection with GitHub.
SP_OBJECT_ID=$(az ad sp show --id "$ARM_CLIENT_ID" --query id -o tsv)
APP_ADMIN_ID="9b895d92-2cd3-44c7-9d02-a6ac2d5ea5c3"

az rest --method POST \
  --url https://graph.microsoft.com/v1.0/roleManagement/directory/roleAssignments \
  --headers 'Content-Type=application/json' \
  --body "{
    \"principalId\": \"${SP_OBJECT_ID}\",
    \"roleDefinitionId\": \"${APP_ADMIN_ID}\",
    \"directoryScopeId\": \"/\"
  }"
Decoding the magicexpand_more
- SP_OBJECT_ID: First, we fetch the unique Object ID of the Service Principal we just created. This is different from its Client ID.
- APP_ADMIN_ID: This is the static, well-known ID for the Application Administrator role in Entra ID.
az rest: This is a powerful command that lets us talk directly to the Microsoft Graph API. We are using it to programmatically assign a role.--body: We construct a JSON payload telling the API: "Assign the 'Application Administrator' role (roleDefinitionId) to our new Service Principal (principalId) across the entire directory (directoryScopeId: "/")."
04Step 4: Display Your Credentials
Finally, this command prints the four variables your application needs in a clean, ready-to-use format.
# Display the credentials in a format that can be used with environment variables
printf "ARM_CLIENT_ID=%s\nARM_CLIENT_SECRET=%s\nARM_SUBSCRIPTION_ID=%s\nARM_TENANT_ID=%s\n" \
       "$ARM_CLIENT_ID" "$ARM_CLIENT_SECRET" "$ARM_SUBSCRIPTION_ID" "$ARM_TENANT_ID"
The output will look like this:
ARM_CLIENT_ID=<Application (client) ID>ARM_CLIENT_SECRET=<Client secret value>ARM_SUBSCRIPTION_ID=<Azure Subscription ID>ARM_TENANT_ID=<Directory (tenant) ID>
The output will show your credentials in the format shown above. Make sure to save these values securely.
CLI
terminalCreate an Azure Service Principal with the CLI (The Fast Way)
This guide provides the command-line instructions for creating and configuring an Azure Service Principal. It's the developer-focused alternative to the portal method, designed for speed and automation.
shield_lockPrerequisites: Get Your Environment Ready
Before you begin, make sure you have the Azure CLI installed and are logged in.
01Install Azure CLI
macOS
brew install azure-cliWindows
Download and run the installer from: https://aka.ms/installazurecliwindows
Linux (Debian/Ubuntu)
curl -sL https://aka.ms/InstallAzureCLIDeb | sudo bashVerify Installation
After installation, verify it's working by opening a new terminal and running:
az version02Log In and Select Your Subscription
Run the interactive login command. This will open a browser window for you to authenticate.
az loginOnce you authenticate, the terminal will list your available Azure Subscriptions, like so:
No Subscription name Subscription ID Tenant--- -------------------- ------------------------------------ -----------------[1] * Azure subscription 1 58z7ghje-zt34-5612-ss9q-s4qj845b8745 Default Directory-The default is marked with an *; ...Select a subscription and tenant (Type a number or Enter for no changes):
The default subscription is marked with an asterisk (*). If you need to change the active subscription, you can use:
az account set --subscription 'YOUR_SUBSCRIPTION_ID'The All-in-One Script
The following steps will walk you through a script that automates the entire setup. We'll run it piece by piece to understand what's happening.
01Step 1: Set the Service Principal Name and Get Your Subscription ID
First, we'll define a name for our Service Principal and automatically fetch the ID of your currently active Azure subscription.
SP_NAME="otoshek-sp"
SUB_ID=$(az account show --query id -o tsv)
What's happening?expand_more
- SP_NAME: We're giving our Service Principal a descriptive name.
- SUB_ID: We're using the
az account showcommand to get details about the active subscription. The--query id -o tsvpart filters the output to return only the subscription ID in a clean, text-only format.
02Step 2: Create the Service Principal and Assign Roles
This is the powerhouse command. It creates the Service Principal, assigns it the Contributor role on your subscription, and captures its essential credentials.
# This command creates the service principal and captures its credentials
ARM_VARS=($(az ad sp create-for-rbac \
             --only-show-errors \
             --name "$SP_NAME" \
             --role Contributor \
             --scopes "/subscriptions/$SUB_ID" \
             --years 1 \
             --query "[appId,password,tenant]" -o tsv))

# Extract the values from the command output
ARM_CLIENT_ID=${ARM_VARS[0]}
ARM_CLIENT_SECRET=${ARM_VARS[1]}
ARM_TENANT_ID=${ARM_VARS[2]}
ARM_SUBSCRIPTION_ID=$SUB_ID
Let's break down az ad sp create-for-rbacexpand_more
--name "$SP_NAME": Assigns the name we chose in Step 1.--role Contributor: This is the Azure RBAC Role. It grants broad permissions to create and manage resources within your subscription (like web apps, service plans, etc.).--scopes "/subscriptions/$SUB_ID": This limits theContributorrole to your specific subscription, preventing it from accessing other subscriptions.--years 1: Sets the credential's expiry.--query "[appId,password,tenant]" -o tsv: This is key. It filters the command's JSON output to give us only the three values we need: the Client ID, the Secret, and the Tenant ID, formatted as plain text.
How do the ARM_ variables get set?
The output of the az command is captured into a shell array named ARM_VARS. We then assign each element of that array to our final, clearly-named variables (ARM_CLIENT_ID, ARM_CLIENT_SECRET, etc.).
03Step 3: Grant Directory Permissions for OIDC
Your Service Principal needs one more permission: the ability to manage application settings in Microsoft Entra ID. This is crucial for setting up the OIDC connection with GitHub.
SP_OBJECT_ID=$(az ad sp show --id "$ARM_CLIENT_ID" --query id -o tsv)
APP_ADMIN_ID="9b895d92-2cd3-44c7-9d02-a6ac2d5ea5c3"

az rest --method POST \
  --url https://graph.microsoft.com/v1.0/roleManagement/directory/roleAssignments \
  --headers 'Content-Type=application/json' \
  --body "{
    \"principalId\": \"${SP_OBJECT_ID}\",
    \"roleDefinitionId\": \"${APP_ADMIN_ID}\",
    \"directoryScopeId\": \"/\"
  }"
Decoding the magicexpand_more
- SP_OBJECT_ID: First, we fetch the unique Object ID of the Service Principal we just created. This is different from its Client ID.
- APP_ADMIN_ID: This is the static, well-known ID for the Application Administrator role in Entra ID.
az rest: This is a powerful command that lets us talk directly to the Microsoft Graph API. We are using it to programmatically assign a role.--body: We construct a JSON payload telling the API: "Assign the 'Application Administrator' role (roleDefinitionId) to our new Service Principal (principalId) across the entire directory (directoryScopeId: "/")."
04Step 4: Display Your Credentials
Finally, this command prints the four variables your application needs in a clean, ready-to-use format.
# Display the credentials in a format that can be used with environment variables
printf "ARM_CLIENT_ID=%s\nARM_CLIENT_SECRET=%s\nARM_SUBSCRIPTION_ID=%s\nARM_TENANT_ID=%s\n" \
       "$ARM_CLIENT_ID" "$ARM_CLIENT_SECRET" "$ARM_SUBSCRIPTION_ID" "$ARM_TENANT_ID"
The output will look like this:
ARM_CLIENT_ID=<Application (client) ID>ARM_CLIENT_SECRET=<Client secret value>ARM_SUBSCRIPTION_ID=<Azure Subscription ID>ARM_TENANT_ID=<Directory (tenant) ID>
The output will show your credentials in the format shown above. Make sure to save these values securely.
Portal
bookCreate an Azure Service Principal in the portal
Before We Begin
In this tutorial, we'll be working in two main areas of the Azure Portal:

Microsoft Entra ID

Subscriptions
Can't find these in the portal?expand_more
Use the search bar at the top of the Azure Portal and type either:
entrafor Microsoft Entra IDsubscriptionsfor Subscriptions
01menu_bookCreate App Registration (single-tenant)
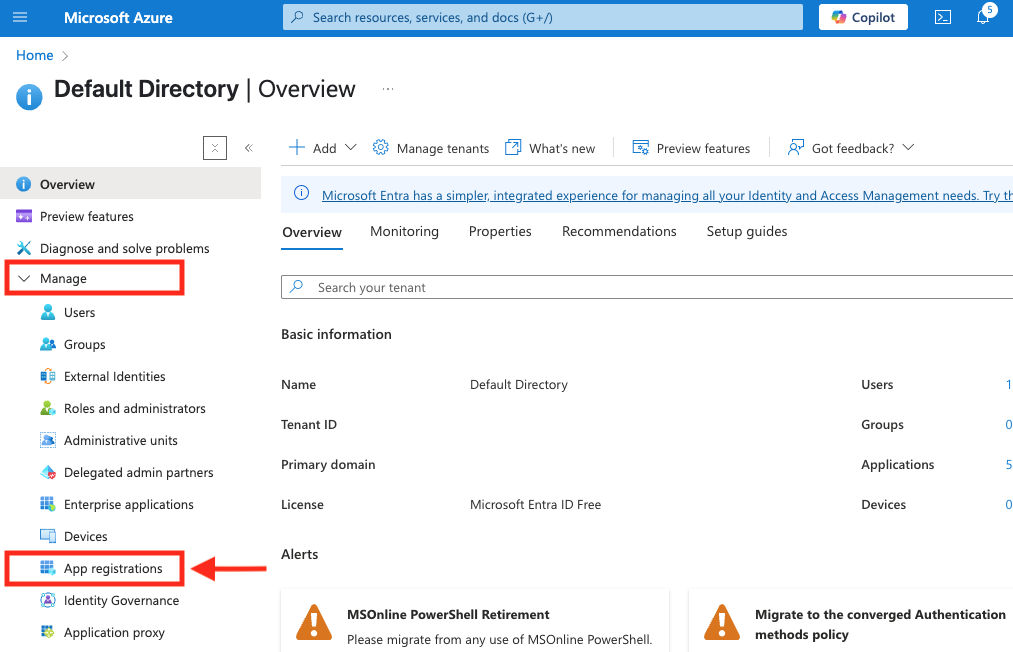
- Go to Azure Portal → Microsoft Entra ID → App registrations
App registrations in Azure Portal sidebarClick to enlarge ↗ - Click + Add, then fill:
- · Name: Choose a meaningful name that describes the app (e.g.,
otoshekif deploying with Otoshek) - · Select Accounts in this organizational directory only for the "Supported account types" option
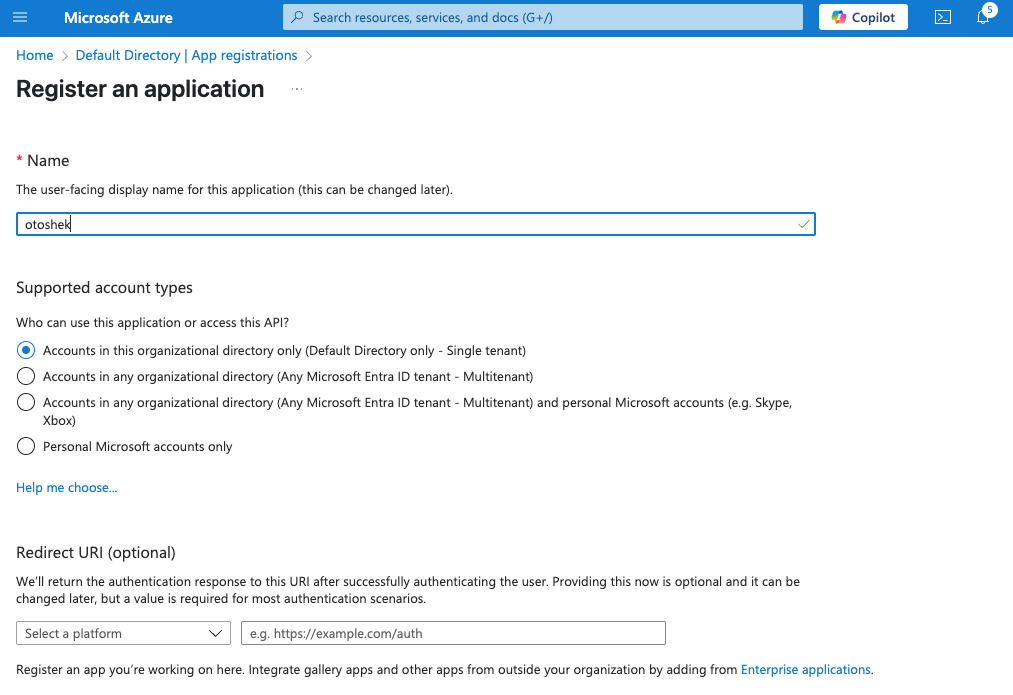
Register an application form in Azure PortalClick to enlarge ↗ - · Name: Choose a meaningful name that describes the app (e.g.,
- Hit Register
- Copy these values for later use:
- · Application (client) ID → This is your
ARM_CLIENT_ID - · Directory (tenant) ID → This is your
ARM_TENANT_ID
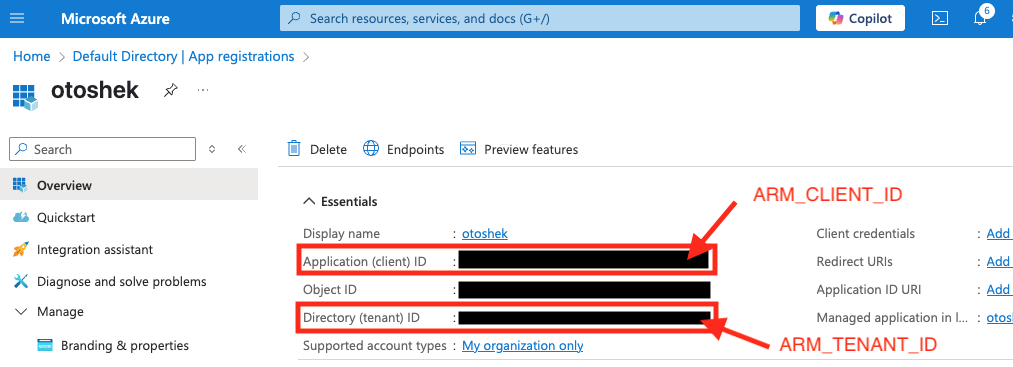
App registration overview showing client ID and tenant IDClick to enlarge ↗ - · Application (client) ID → This is your
02keyCreate a Client Secret
- Inside your App registration, open Certificates & secrets
- Click + New client secret, then set:
- Description: e.g.
ExternalProvider-Access - Expires: per your policy (e.g. 6 months)
- Description: e.g.
- Click Add
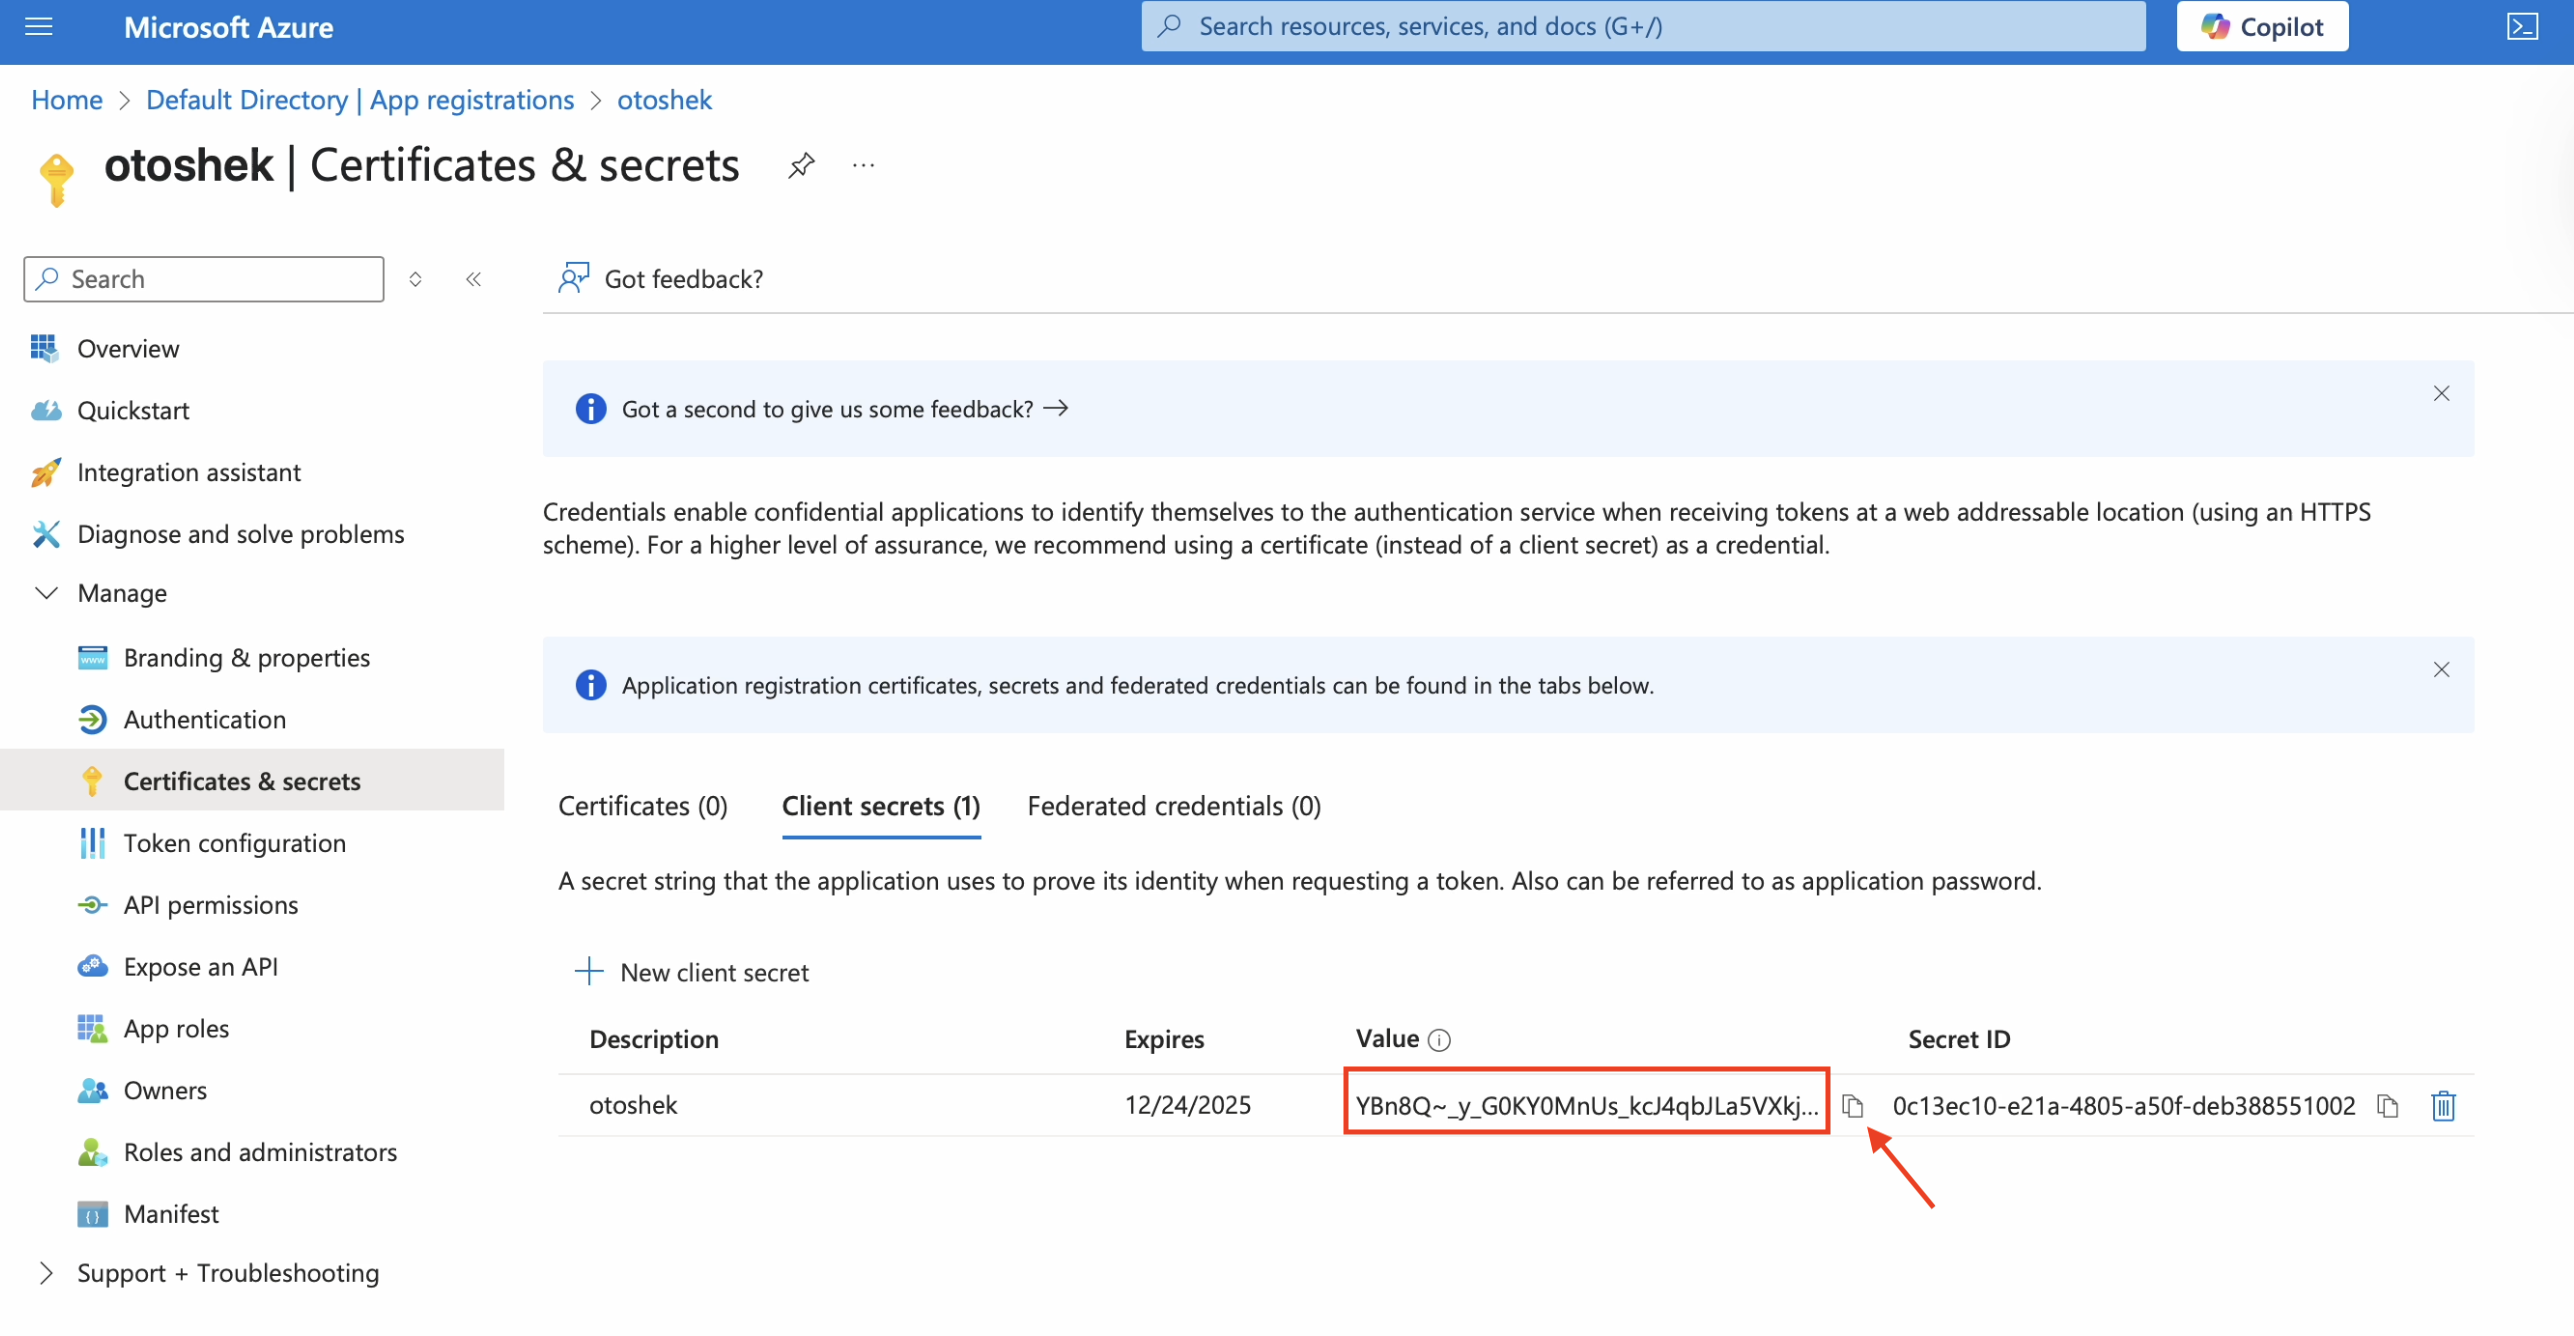
Copy the secret value (not the Secret ID) → this is your ARM_CLIENT_SECRET.
03groupAssign Azure RBAC Role: Contributor
- Navigate to Subscriptions → [Your subscription] → Access control (IAM)
- Click + Add → Add role assignment
- Select category: Privileged administrator roles
- Set the following:
- · Role: Contributor
- · Assign access to: Service principal
- · Select your App registration (e.g. otoshek)
- Review + assign
04shield_lockAssign an Azure AD Role to the SP
- Head to Microsoft Entra ID → Roles & administrators
- Select Application Administrator
- Add assignments → pick your service principal